Get Started with the WuHu Courier App
The WuHu courier app is available for download on iPhone and Android devices. As of April 21, 2020 we are running the platform in pilot mode. To get started contact support@wuhu.io and request access to the WuHu IOS or Android application to install on your phone.
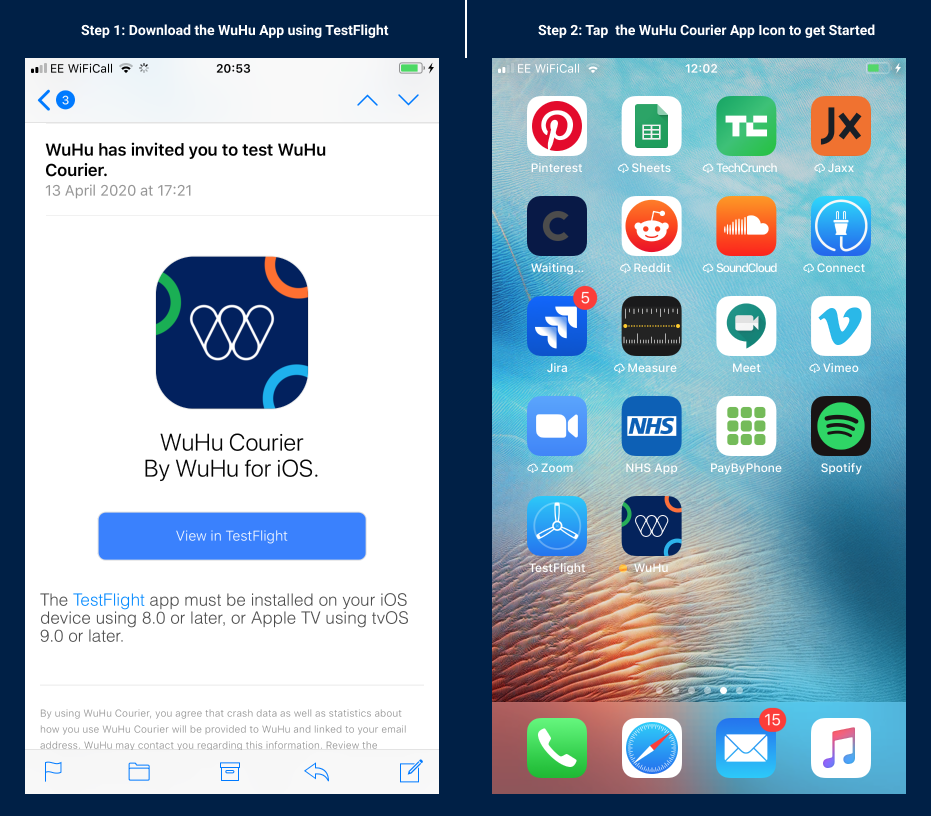
iPhone: To download the IOS application provide us your Apple ID email account. You will receive an email with an invitation to download the WuHu app using the Apple TestFlight application. Once you have downloaded the Apple TestFlight application, open the TestFlight application and download the latest version of the WuHu application. Check out our FAQ article for a step by step guide to downloading TestFlight and WuHu IOS application.
Android: To download the WuHu Android application provide us your Gmail address to receive a link to download the Android WuHu application from the Google Play Store. The WuHu application is available by invitation only and not for public download during the pilot period.
Once you have downloaded the WuHu application on your phone your all set to grow your independent courier service, receive bookings from local businesses and clients, accept and manage multi-order bookings, optimise route planning and get paid directly to your bank out for all completed deliveries through the WuHu platform.
How to: Get Started for the first time with creating your account
- Open the downloaded WuHu courier app after following the above iPhone or Android steps.
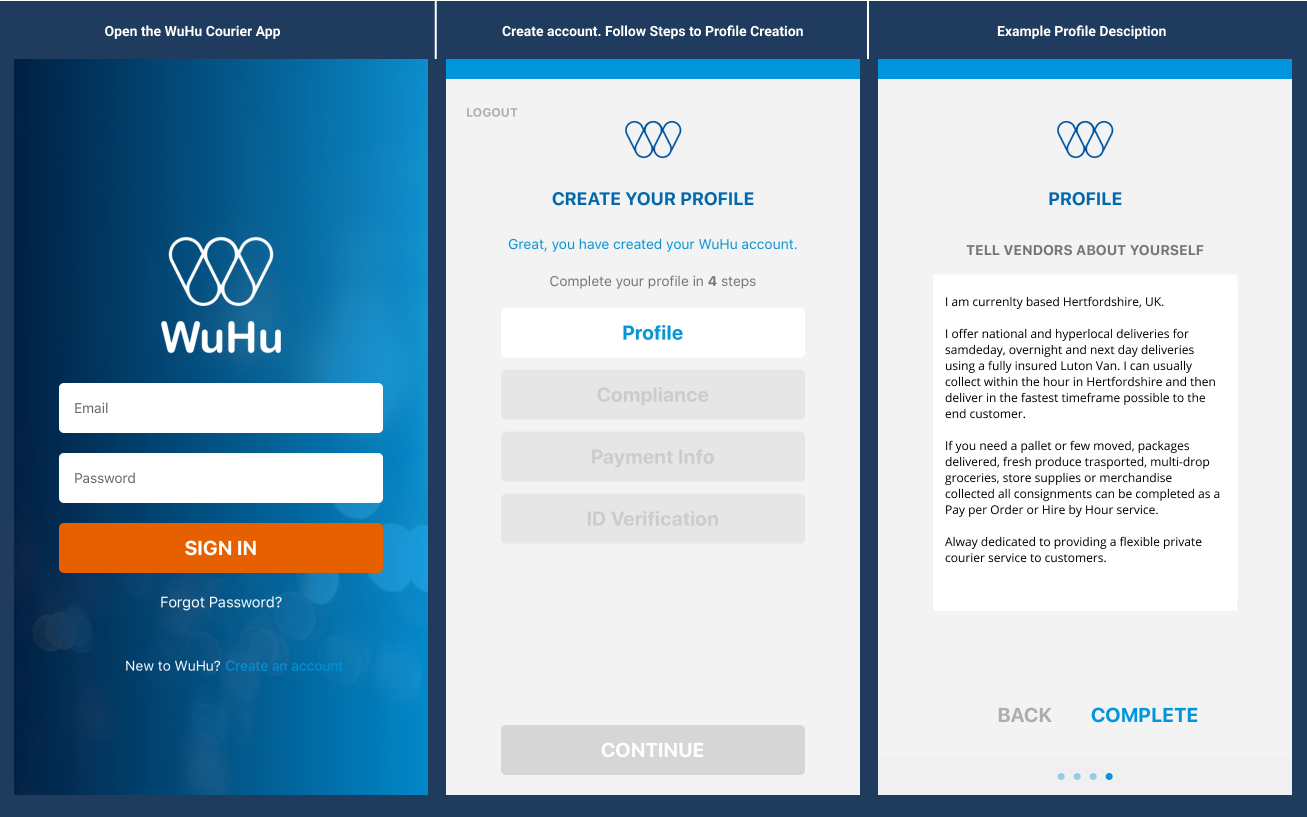
- Below the SIGN IN button Tap the option New to WuHu: Create an account
- Type your First and Last Name, email address (your email address is your UserID for your WuHu courier account).
- Enter a strong, unique password
- Provide your mobile number (this will appear as part of your profile contact details when businesses and clients book your services).
- Click the box to agree to the WuHu Terms and Privacy Policy.
- Click Create Account
- An email with be sent to your email UserID with a unique verification Code
- Enter the 6-character verification code to the courier app to complete the email verification step
How To: Create your unique independent courier service profile
Profile: Create a profile is a 4-step process beginning with creating your courier service profile where you begin with providing your address, a description of your courier service and set your private hire rate.
Compliance: This is followed by Compliance where you select your delivery service vehicle(s), enter your date of birth and confirm you understand your responsibilities as an independent courier service provider.
Payment Info: In the payment info, provide your bank account details in which you would like all payments received for all completed deliveries. Funds will be credited automatically to your courier account after each engagement and paid into your bank account daily on a 7-day rolling basis. This means that deliveries completed a Tuesday will be paid out into your bank account the following Tuesday.
ID Verification: In order for us to successfully process payments to your bank account we have to verify that you are who you say you are. Make sure your profile details match your bank account and Identification to avoid unnecessary payment issues. This is required by us to comply with government regulatory obligations.
A guide around the courier application
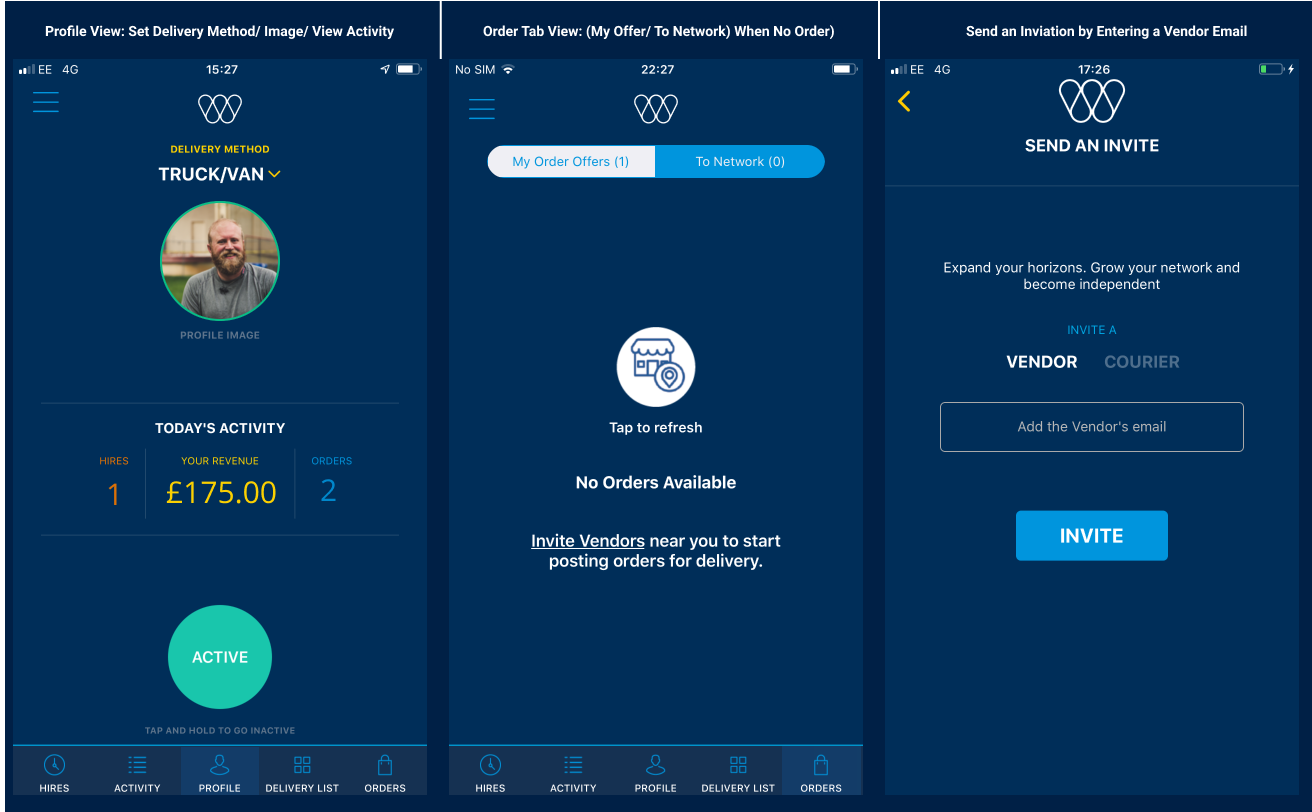
Profile Home Tab: The profile home tab provides you a summary of your day to day activity from how many orders and hires completed the amount of revenue. From the profile tab always make sure to select your means of transport so that businesses and clients have a view of your method of delivery. Tap the profile image to upload a photo to your profile.
Go Active/ Go Inactive: Use the Go Active button when you are ready to go online and notify local businesses and clients that you are available. To go active press and hold the button until it transitions to green and the button status transitions to active. Similarly, to go inactive you must press and hold until it transitions to blue and status changes to inactive. When you go active local businesses can view your active profile from within the vendor application and offer to book your services.
When there are no orders posted locally for delivery an icon will appear with the option to tap to refresh in case a new order was just posted. There is also the option to tap Invite Vendors which will allow you to invite local Businesses and Clients you may know to join the network.
The Menu Hamburger Options:
From the menu hamburger select Edit Profile to update or edit your profile details when required. Use the Invite Vendors or Couriers option to invite local businesses and clients to join the local network to book your services. You can send a maximum of 10 invitations a day. If you have an enquiry use Support to navigate to the WuHu Help Centre to find answers or submit an enquiry using the Request Form.
Orders
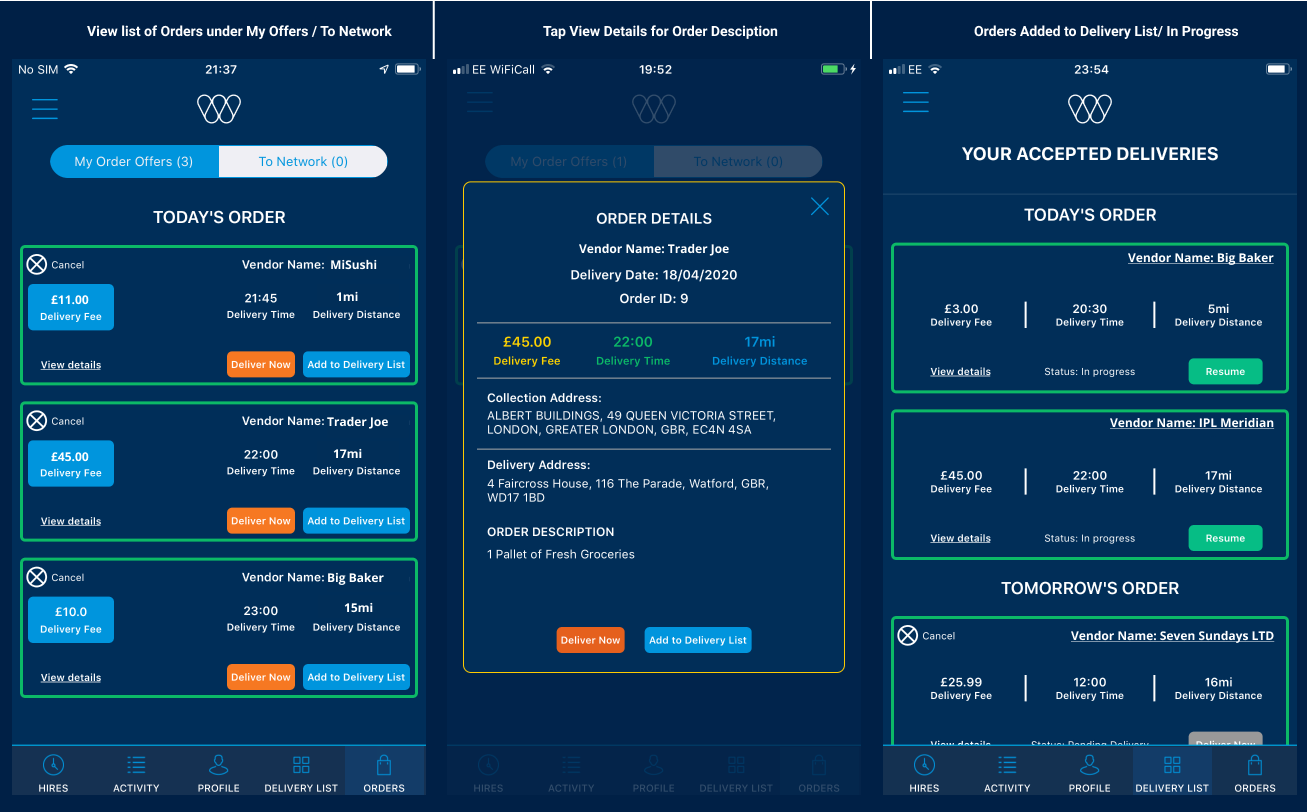
You can view all orders posted to you under the Order tab. Orders are sorted by “My Offers” and “To Network”. My Offers consist of all Pay per Orders posted directly to you to view and accept. To Network orders, consist of all orders posted to the local network of couriers on a first come first serve basis.
All orders are sorted by Date and Time with the option to Add to Delivery list or Accept Now and start the delivery. Tap the view order details to expand the order and view order details including Vendor Name/ Order ID/ Delivery Date/ Delivery Time/ Delivery Fee/ Delivery Distance/ Collection Address/ Delivery Address and the Order Description. There is also the option to either select to Deliver Now or Add to Delivery List.
Delivery List
The Delivery list consist of all orders you have Accepted or selected to Add to Delivery List. This displays a list of all your deliveries in order of date and time for you to manage your deliveries. Note that you can Start multiple deliveries at the same time just tap resume to return and select an order that is in progress. A delivery is only removed from the Delivery List once it is completed or you select to Cancel the order before starting the delivery.
Delivery Order Protocol:
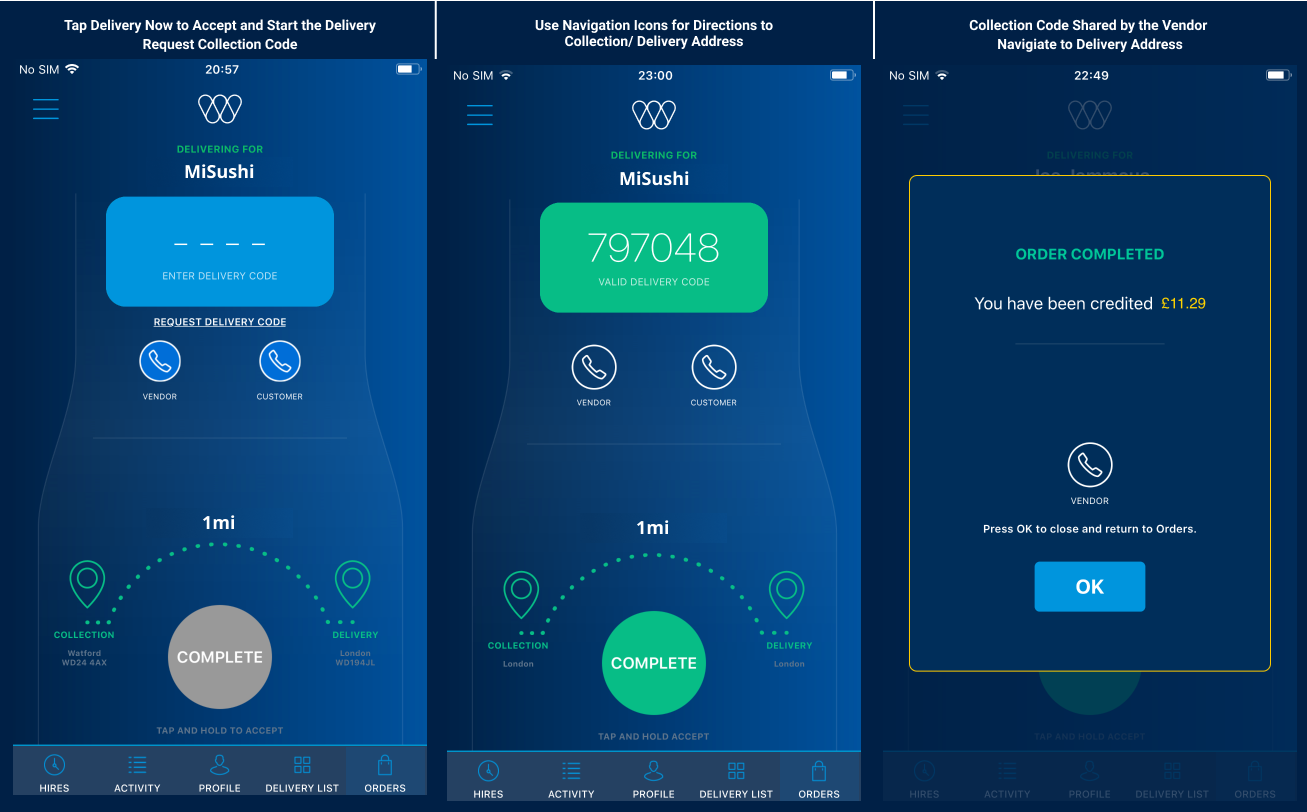
Once an order is Accepted and you start the Delivery you will require the vendor to share with you the collection code. Use the navigation icons to tap and get optimal navigation routes to the collection point. Use the phone icons to select to call the vendor if required to request the Collection Code, notify them if you are running late or request any details. When you are ready to receive the Collection Code tap Request Collection Code. This will notify the vendor to share the collection code.
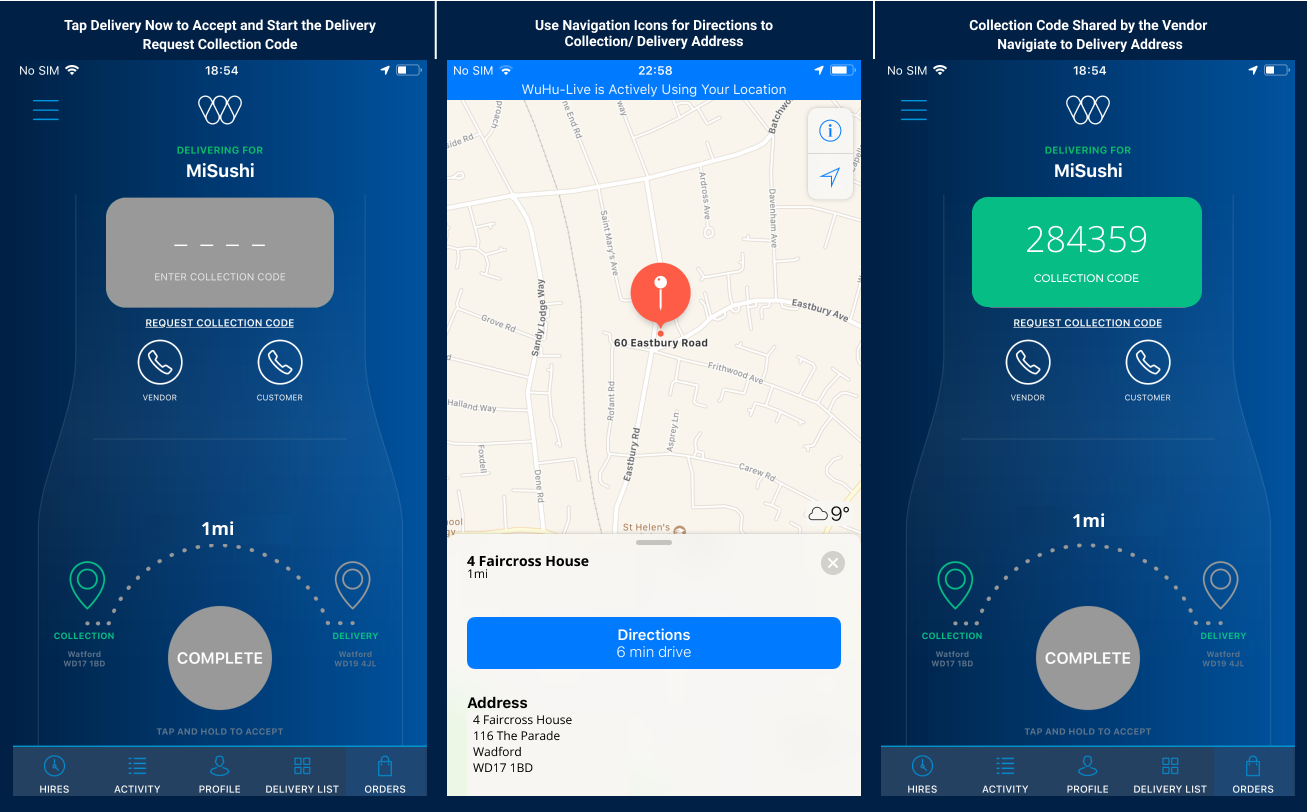
Similar to when requesting the Collection Code when you arrive at the delivery destination tap Request Delivery Code. This will notify the vendor to share the code. A 2 min countdown will start for the vendor to share the code. If the vendor has not shared the code during the 2 min count down you can tap again Request Delivery Code or call the vendor to re-share the delivery code. When the vendor shares the delivery code they will be charged and the payment if successful will be credited to your account. When the Delivery Code is shared tap and hold the Complete button to mark the order as completed and to complete the delivery.
If payment is unsuccessful the order will be marked as cancelled and you will not be credited for the delivery. In such cases contact the vendor notifying them that payment was not successful and to arrange payment for the order by correcting their payment details and reposting a new order.
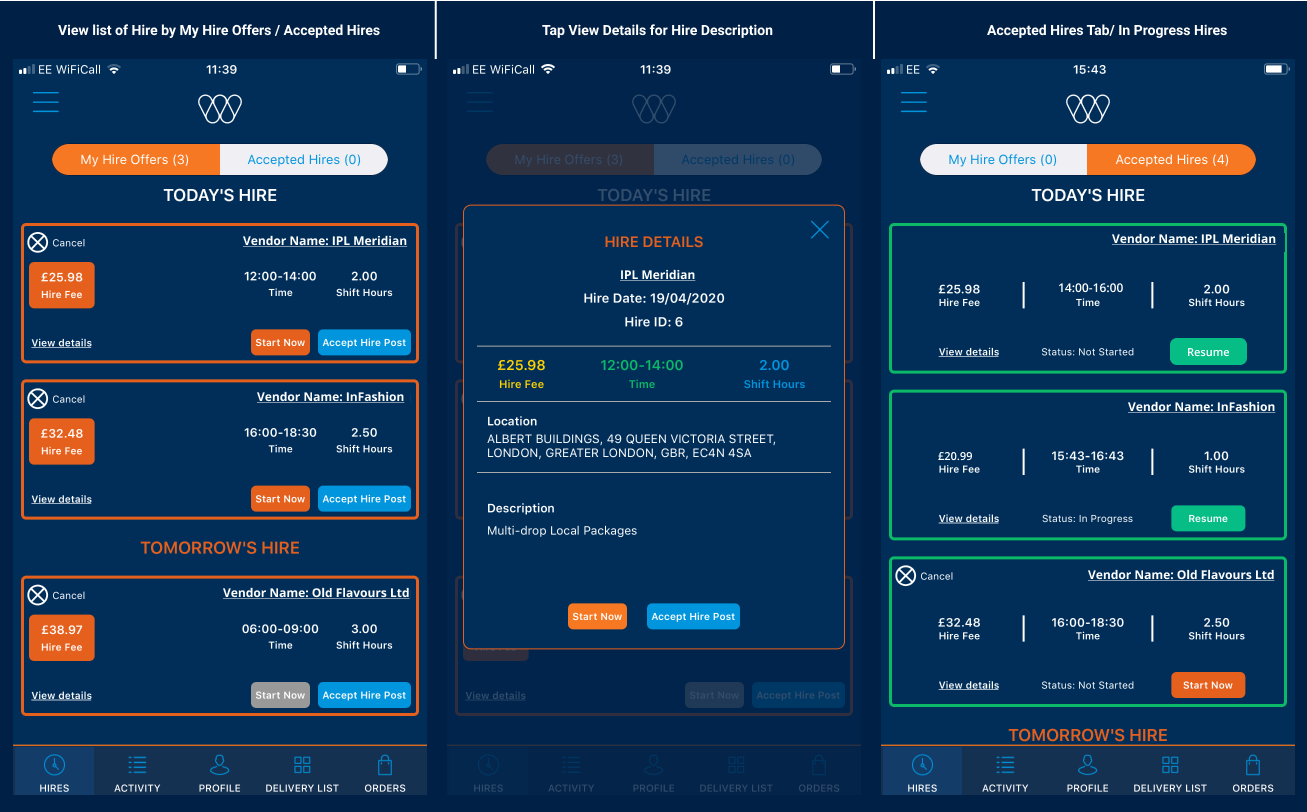
Hire List:
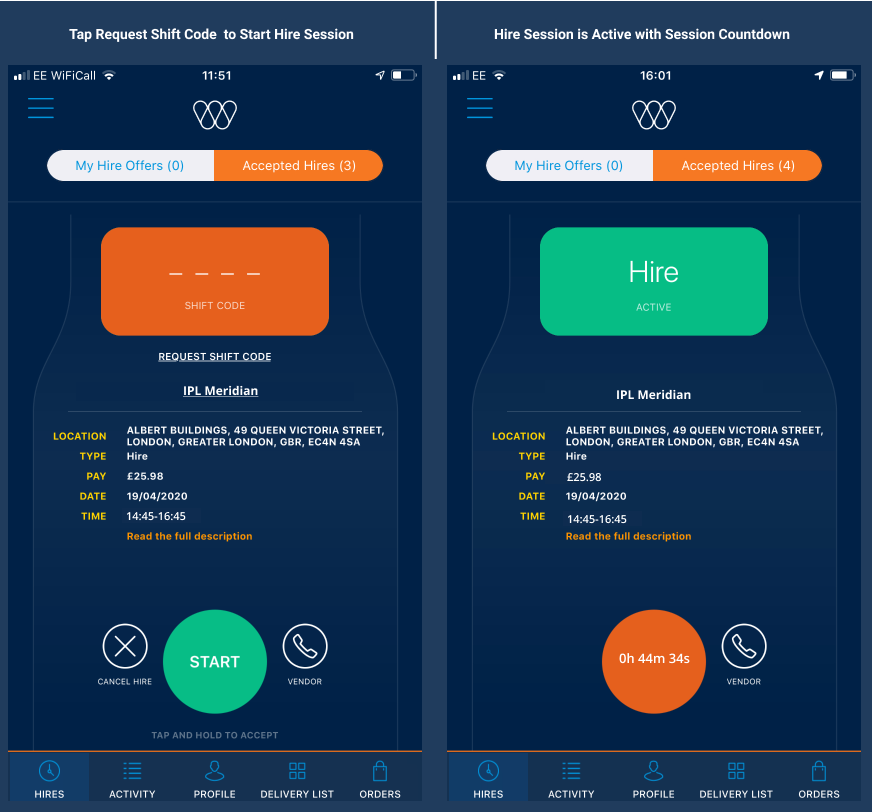
You can view all hires posted to you under the Hire tab “My Hire Offers”. “My Hire Offers” consist of all Hire by Hour pending your review to Start Now/ Accept Hire Post/ Cancel. Once a hire is Accepted it is moved to the Accepted Hire tab.
All Hires are sorted by Date and Time with the option to Start Now. Tap the View Detail to expand the hire and view details including Vendor Name/ Order ID/ Delivery Date/ Delivery Tim/ Delivery Duration (this is listed in minutes)/ Location (Address to Start Hire) and the Hire Description. To start the hire tap, Start Now this will require you to request the vendor to share the Shift Code when you are ready to start the shift. Once the vendor shares the shift code you are credited for the hire engagement. Tap and hold the Start button to activate the hire session count down. This will start the hire countdown for the duration of the hire. Once the hire is completed the hire will no longer appear in the Accepted Hire Tab. You can view all your completed activity under the Activity Tab which lists all completed orders and hires.
If payment is unsuccessful the hire will be marked as cancelled and you will not be credited for the delivery. In such cases contact the vendor notifying them that payment was not successful and to arrange payment for the Hire by reposting a new hire once they have corrected their payment issue.
When there are no Hires posted an icon will appear with the option to tap refresh in case a new Hire may have been just posted. There is also the option to tap Invite Vendors which will allow you to invite local Businesses and Clients you may know to join the network.
Activity Tab
The Activity Tab provides you a list of all dates on which you have completed Orders and Hires. Tap an Activity Report date and you can view all Orders and Hires completed for that date. Activity is sorted by Orders and Hires in Separate tabs. At the top of each date you can view the Total Credit (this includes all orders and hires completed on that day). All activity is listed so you can view the Time the order was completed, the Vendor name and the Total (the Total is after platform fees) this is the amount to be credited to your bank account. If you select the plus [ + ] icon a popup provides you more details including the Order Ref Id/ Type (Order/ Hire)/ Time (transaction time)/ Vendor Name/ Hours (duration of time for completed hires)/ Status (Settled for all payments that were successful or rejected for all payments not successful).
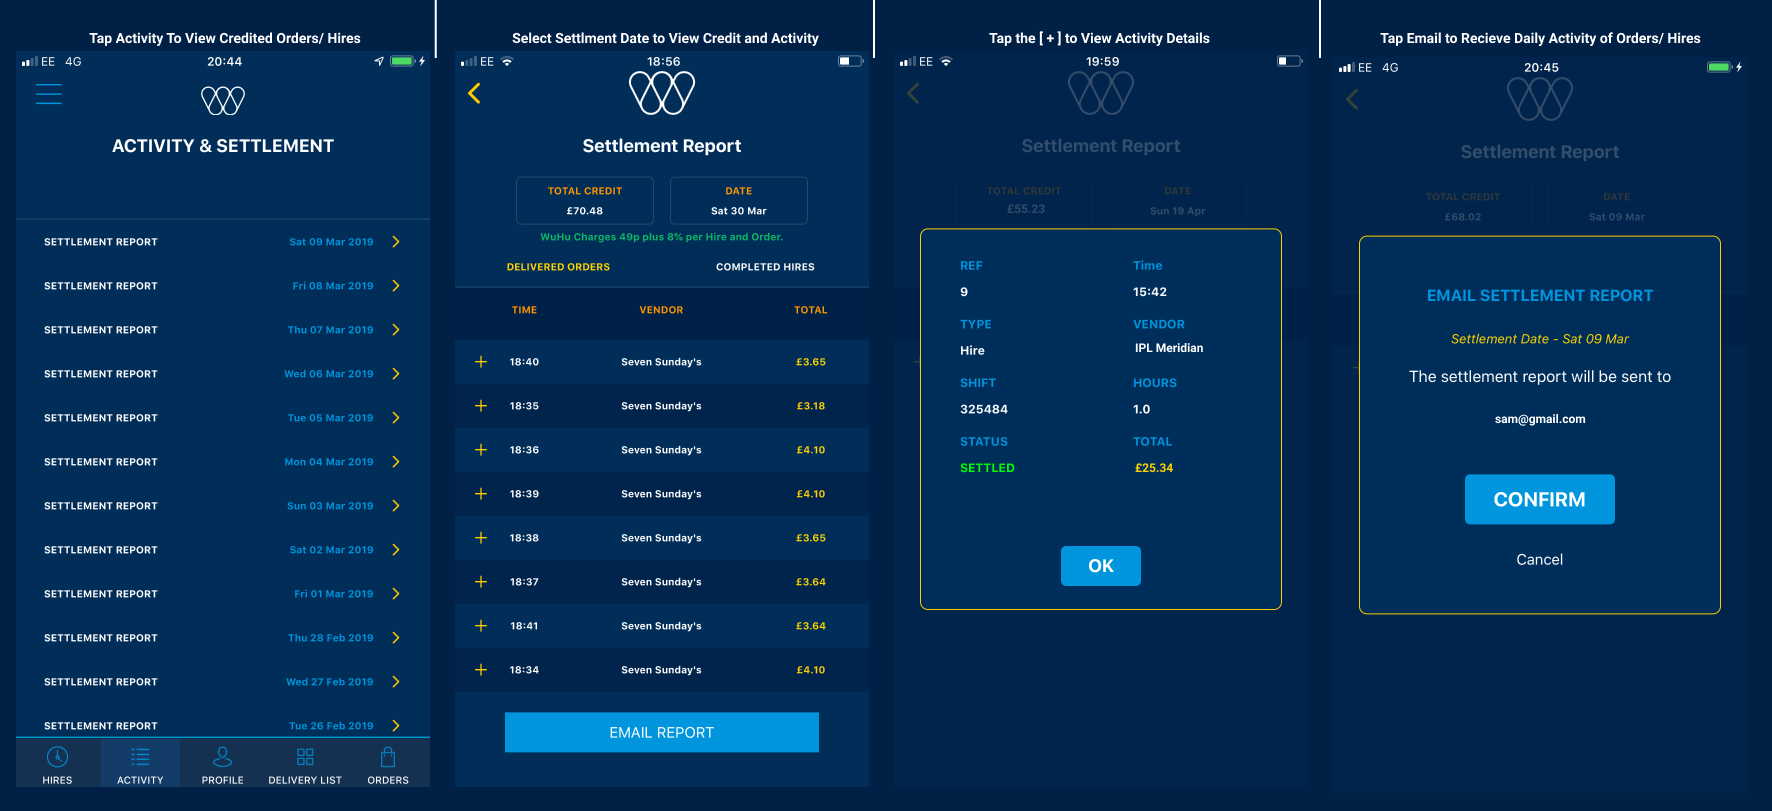
Use the Email Report to send yourself an email report of all your Order or Hire activity. This is a good way to keep a record of all your activity. Activity reports in your courier app are available for 45 days. Make sure to send yourself an email version of the report before the data is automatically purged from your courier app.
We are constantly improving and updating the WuHu operating system with new features and platform enhancements. We make all effort to make sure our guides remain up to date and relevant. But if you every have any questions we would love to hear from you. For any enquires please contact support@wuhu.io for any additional information or enquires.